Friday, March 30, 2012

Yippee! It's a wall!

Core filling this morning went perfectly, I had a bit of a mad scramble setting up a work platform along the wall before the pump arrived, but got it done and got the cores wetted down nicely before the concrete arrived.


The first shot from the pump was a little dry, but after we added some water to the mixer it flowed beautifully, only needing a little rodding with a rebar offcut to encourage it to the bottom of the wall.  We took a 20 minute break after filling the wall half way to allow the first lift to go off a little, then poured the rest.


My fears of blowing out blocks were largely unfounded - we took it slow and the blocks which I thought would cause a problem were fine.  I did spot one block towards the top of the wall which had cracked after I laid it (but before we filled it) so I braced that one to make sure it didn’t move.  It didn’t 8)


Thursday, March 29, 2012

The ramming plan

I basically have four panels to ram - three are 2000mm long, one is 2100 (and there’s also the infill above the door, which is 900 long, making for a 9m wall in total). I’m ramming the wall 400mm wide, for two reasons - firstly, the engineering spec suggests (but does not require) a 400mm base tapering to a 300mm top, but I think it will be much easier ramming the wall parallel. The second reason is that the panels have internal reo mesh, so the additional width will be welcome space during the ramming.


The fact that I have one 2100 long panel complicates the forms a little, but not by much - it means I have one additional set of holes for clamping bolts, but I should be able to blank these with some appropriate sized dowel when I don’t need to use them, and hopefully this will prevent the wall being damaged by “plugs” of earth being torn out when the forms are removed.


So this first illustration shows the assembled forms for the 2100 long wall panel, with reo in place. Each 600 high form is secured by two bolts on each end, and will be bolted in four places to the form above when that is placed.


Note that the column which forms the end of the wall has a “plain” surface - with my layout there will be no need to pass bolts through the joint which this column forms, so I can avoid the disruption to the end surface which would be caused by the grooves necessary to allow the bolts to pass through.


After this panel is rammed, the columns are moved to the other side of the doorway to form up the first 2000 long panel. Note that one column will have a block fitted to form a rebate in the earth wall, in order to allow positioning of the lintel prior to ramming the infill above the door. The through bolts miss the wall completely on the doorway side (again, keeping the surface smooth) but pass through the column at the joint between the wall panels at the other end.


And again with ramming in progress.


The columns and forms are then moved to the other end of the wall, leaving a gap which will be filled in last. Note the tapered rebate formed in the wall as a control joint - this will be lined with foam to keep the wall panels physically separate, and allow any expansion or movement without causing cracking. Not that the wall will go anywhere anyway, but it’s in the spec.


Then finally, the columns are removed and the forms clamped against the wall panels. For this one the through bolts pass through the joint between the wall panels, using the semi-holes left by the bolts when each was rammed.


So this is the plan. I aim to get the forms pretty much complete this weekend (in addition to the core filling of the retaining wall.. wish me luck!) and potentially ram another test block using these forms and the actual wall materials over the Easter weekend, then get into the ramming proper the weekend afterwards.


Any volunteers? :)

Tuesday, March 27, 2012

Reo detail

A little more work in Sketchup tonight to detail the type, size and placement of the reo mesh inside the rammed earth walls. As usual I’m glad I’ve done this work, because I’ve picked up (yet again) a couple of little gotcha’s which would have made the earth ramming a little challenging in a couple of places.


Case in point - without having placed the starter bars in the drawing before jumping in and doing them for real, I wouldn’t have realised that they will interfere with the placement of the end column forms. Since I’ll be leaving a gap between panels as I ram them (and filling in the gap without using the columns, bracing against the rammed section of walls), if I installed the starter bars in these gaps then I’d have nowhere to place the column on that side.


Thanks, Sketchup! :D


Monday, March 26, 2012

Super Supagas!

I dropped into Supagas at lunchtime today with my empty acetylene bottle, all set for a fight over paying for a replacement for the one they gave me last time which was nearly empty.


Me: “I was in a couple of weeks ago for an acetylene bottle, and you gave me an empty.”


Them: “Huh?”


Me: “The bottle you gave me had nothing in it, it didn’t have a cap in the valve which should have tipped me off, but I didn’t check until later and it was empty. My oxygen is still full!”


Them: “Righto, that’s odd. Let’s just swap it over then.”


And that was it. I walked away with a full bottle, no questions asked.


How’s that for customer service? :)

Sunday, March 25, 2012

More formwork!

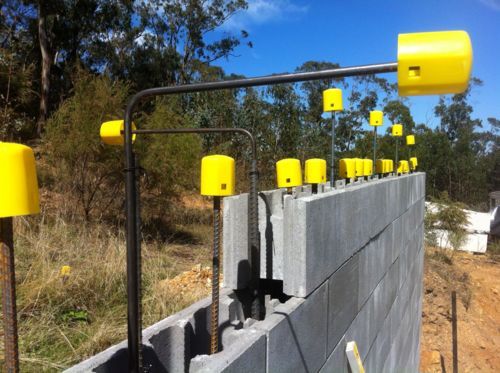
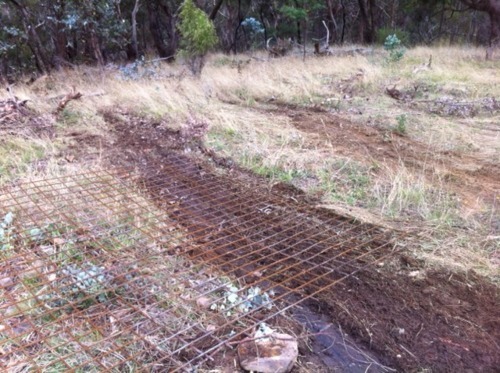
No rain today, so I managed to get a far bit of progress made on the forms for the rammed earth wall.


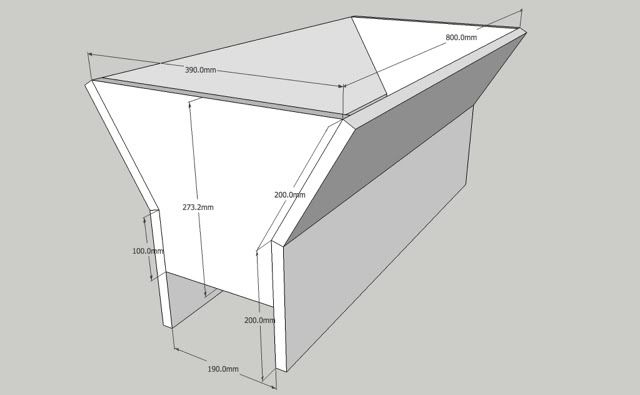
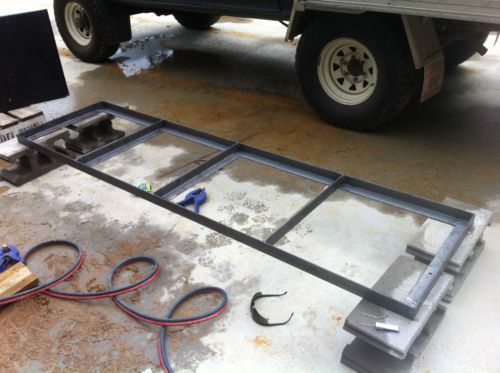
My design for these is changing almost weekly, but I think I’ve finally arrived at a final prototype. The columns are pretty much done, with only one set of chamfers and a control joint tongue to cut. The side panels however are going to take quite a lot longer to put together…


The thing I love about working with timber is the instant gratification. It doesn’t take much effort or time to cut the timber to precise length, and screw / nail / glue it together and bam, you’ve built something.


Maybe I’m just new at it, but working with steel is just a pain in the arse in comparison. Firstly, I’m finding it a lot harder to cut the steel with anywhere near the same level of precision. Granted that’s probably my choice of tools (a GMC chop saw and Ozito angle grinder) but putting that aside it takes much longer to cut. I spent all morning just cutting up the 50x50x5 steel angle to length.


Then, once the steel is cut it has to be assembled which means welding. Now, I know I’m a rank amateur with the oxy torch, but still this takes forever! Nothing as simple as drilling a clearance hole and screwing in a tek screw or coach bolt.. there’s the initial tack welding assembly, then going back and butt or seam welding the pieces together. And then it’s inevitable that I’m going to have stuffed something up, but I can’t just unscrew that bit and adjust it; the welds have to be ground off (if you can get at them) and … see, it even takes an age just to describe how long it takes to work with steel!


Then there’s the mess and the sparks and the burns and the smell…


Anyway.


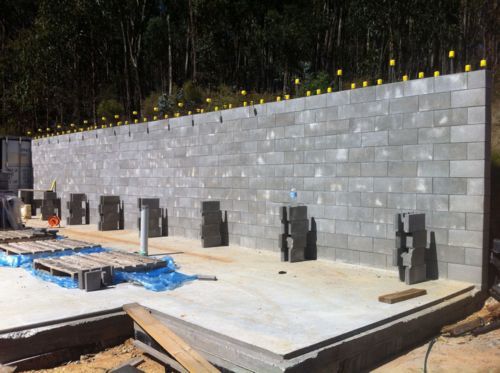
I managed to get one form panel finished, and the steel for a second cut to size. I have however been short changed one bottle of acetylene - I suspected as much the first time I used it, the pressure in the tank was lower than it should have been and the bottle was supplied without a protective cap. Sure enough, I’m out of acetylene and I still have 90% of a full tank of oxygen. Bugger.. that put a stop to the day’s progress.


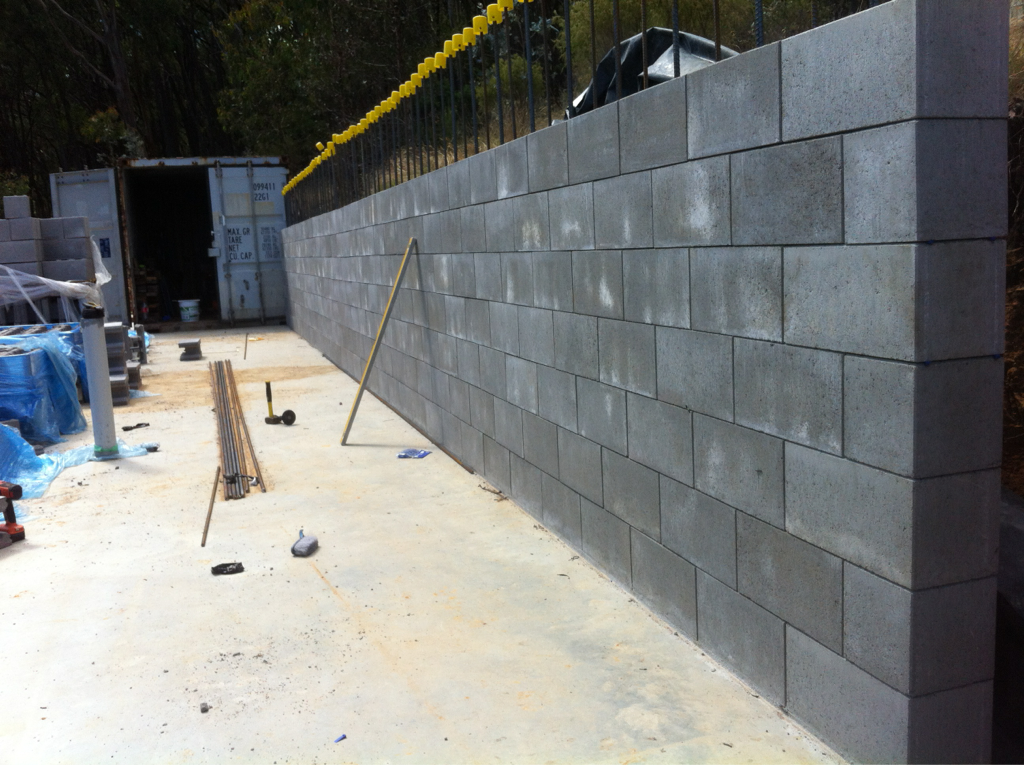
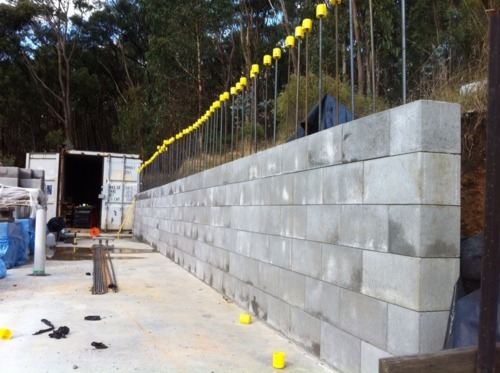
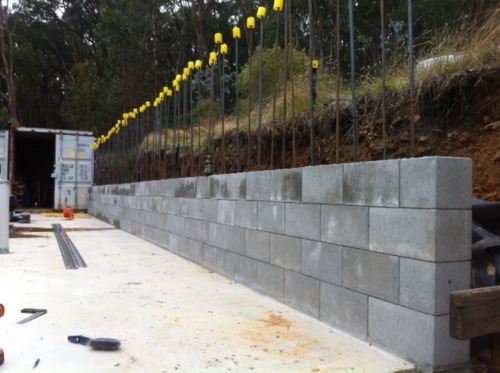
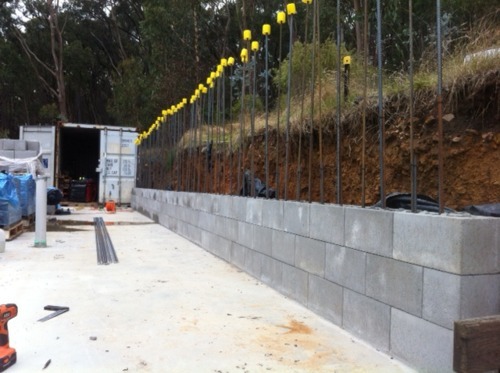
Here’s what I did manage to get done:


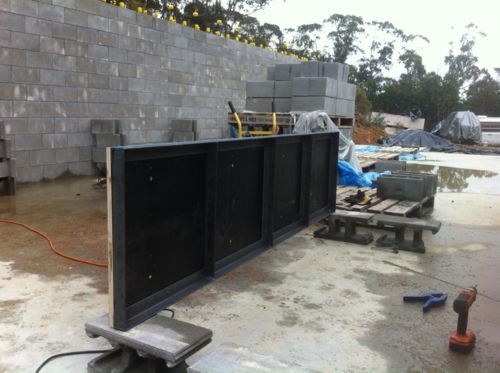
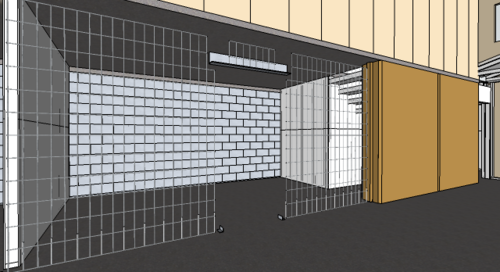
So that’s one down, at least three to go. I may need to build more, if it turns out that I can’t leapfrog the lower panel up above the one I’m ramming against. Wonderful, I’m looking forward to it already…


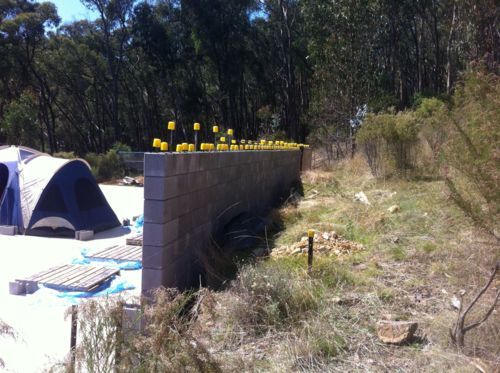
I am glad I decided to build these smaller than I’d first intended - it was a challenge moving this panel into the container, let alone lifting it up 1.8m into the sky. It does seem plenty strong enough though - I can stand on the middle of the panel and it doesn’t bend much if at all, which bodes well for straight rammed earth walls!


(I did notice however that these will make fine work benchtops for the garage when I’m finally finished with them :) That’s a silver lining, and I’m sticking to it!)

Friday, March 23, 2012

Formwork

Some reasonable progress today in between rain showers.  I really need an area under cover so I can set up the saw bench without having to pack it up when the rain starts…


The Hilux tray sure does make a convenient work platform, and when it rains I can just bundle all the tools up and throw them onto the back seat :)


I’ve managed to put both columns together, although the second doesn’t have the chamfers yet.  These are a cast iron bastard to cut; my only 45ยบ angle is the back of the guide fence on the saw bench, and cutting 2.6m lengths of pine on that at the full extent of the saw blade is slooooow going, with lots of smoke. Not to mention the circuit breakers on the generator tripping when I try to push too fast…


I still need to cut a 100x50mm chamfered “tongue” for one of the forms to create the control joints, but I think I’ll belay that until I can pick up some suitable timber. I’m tempted to use some 90x45 pine, but the engineering spec asks for 100 wide control joints, so I’ll do it by the book and get the right stuff.


The aim tomorrow is to make up the side panels. I had originally intended to use full 1200x2400 form ply sheets in order to reduce the number of joints visible in the rammed wall, but after putting the columns together I think full height panels will be too heavy to handle by myself without injury.  So instead, I’ll cut them down to 2400x600 and use the 50x50x5 steel angle I have here as horizontal bracing, instead of timber.  This will allow me to bolt two successive courses of forms together accurately and hopefully minimise the visibility of the joint between the panels.

A sign of things to come?

Gearing up to core fill this wall this morning, I called the pump operator at 9am to see how he was progressing with his first job, and what time I could expect him here so I could have the concrete here on time.


Turns out I can’t.


Apparently his pump is playing up on this job and he’s worried about it packing it in completely in the middle of ours.


Just between you, me and the Internet I actually suspect he doesn’t want to bring his truck (which is actually rather new) down to our site as it’s a little bit wet, and he’s worried about getting it back out again. Which given Mr. Steel’s adventures might not be terribly unwise.


So there’ll be no concrete happening today. I’m expecting this place to stay “a little bit wet” now until November, so I wonder how much progress I’ll make over winter…


Oh well, I’ll crack on with making the forms for my rammed earth walls instead. Always something to do :)

Monday, March 19, 2012

Oooh, bugger.

I spent a little time this evening in Sketchup, ticking off a few items from my list of to-dos in the model. Mainly tonight this was drawing the roof structure over the pump room, a valuable exercise as yet again I’ve discovered one or two small gotcha’s before I made them.


Except.


Panning the camera around the back of the retaining wall, I realised I haven’t drawn the required screened air vents into the power room. Ok, no big dea .. oh, wait. I’ve already built this wall!


Damn. I haven’t installed any vents.


It’s too late now - I’ve booked the concrete and the pump for this Friday, and even if I could source the correct vents between now and then (which I can’t) I wouldn’t be able to install them in time. That would require removing blocks from at least two courses, including the horizontal rebar (which would mean removing the whole course). Not going to happen.


So, looks like I’ll be boring through the wall after it’s filled to install some 100mm PVC pipe vents…

Friday, March 16, 2012

Short weekend!

Not much going on this weekend, which feels a little odd I must say - it’s Friday night and I’m back in Melbourne! The wall hadn’t fallen over with the wind, and when the building inspector came by today to have a look at my wall he gave two thumbs up, so we’re clear to core fill next week.


So for the rest of the day (in between rain squalls) I made up a grout hopper out of old form ply which slots over the top of the concrete blocks, so we don’t make an awful mess when the wall is filled. I’ve lined up the same guy who pumped the concrete for the garage slab - he’s not exactly cheap, but he’s a real pro and this is one job that I want to go according to plan. Enough knowledgeable people have told me that core filling is a sod of a job that I’m not going to attempt to take any easy short cuts. (Like so many other things in this project, I’ve never done this before but I can’t really see how pumping a wet concrete slurry into a cavity wall can be a difficult job. I guess I’ll find out next week  )


The hopper didn’t take very long to put together (yet again, designing first in Sketchup saves a heap of time) - I didn’t get a photo of the end result, but it’s almost exactly the same as this:


While I had the saw bench assembled I also started cutting the timbers for my rammed earth forms - I got most of the columns cut before the rain set in again and put an end to the day :(


The rest of this weekend is a bit of a write-off from a building perspective - Ewan wants to go to the Grand Prix tomorrow, and it’s Alissa’s birthday on Sunday (not to mention the F1 race) so there’ll be no more progress now until Friday, when we fill the wall.


Wednesday, March 14, 2012

eBay, again!

Somebody seriously needs to revoke my eBay privileges, stat!


In honesty, I’ve been looking for one of these for a while and it’s something we will definitely get plenty of use out of, but like many of my eBay purchases I don’t quite need it yet ;)


The shipping container sure is getting full of stuff…..

Monday, March 12, 2012

Sleeping on it works!

The second half of the second-last course didn’t take long, then it was time for more steel placement, including the problem L-bars.


In my Sketchup drawing of the retaining wall I had drawn the L-bars such that they were placed as close to the edge of the suspended slab as the spacing would allow for maximum engagement.  This meant that they were positioned in the centre of the blocks in the final course. Problem.


The solution was simple - place one less L-bar and offset them by one bar, placing them at the edge of the blocks rather than the centre. Since the blocks are open at the ends, I could place them between the L-bars with little contortionism.


I’ve also wired in some threaded rod for the top plates supporting the roof above the pump room.


The rest of this course took most of the day, but finally:


It.


Is.


Finished.


:D


2.42m tall and it’s not the straightest wall in the world, but it’s straight enough for me. You can see how the mis-sized blocks crept up on me over the full height of the wall…


The important thing is that I’ll be able to place some forms at the top of the wall so that when it’s core filled, we’ll be able to “over fill” the wall and bring it up to the height we need and make sure the final surface is perfectly flat and level, to accept the forms for the suspended slab.


Speaking of which, I spoke (well, emailed) Peter about these because I’d been completely unable to find an insulated formwork suitable for a suspended slab. Bondor in New Zealand seem to have something like this, but their Australian arm basically only sell wall and ceiling panels for commercial use. True to form, Peter suggests we innovate a little and use second-hand 50mm thick coolroom wall panels, with lots of propping. Sounds like a plan - I have a lead on some of these for about $15 per square metre, which is about a quarter of the price of the non-insulated Kingflor forms which were originally specified in our building permit.


I never did get around to propping the wall, so knowing my luck it’ll have fallen over by the time I get back to it on Friday for the building inspection…

Sunday, March 11, 2012

Short day today

Didn’t get as much done today as I’d hoped, but still managed to wire up and lay half a course. Having two of the boys with me is at once a hindrance and a help - they cooperated in making up some wire ties for me very well, but on the other hand I’ve had to set up the tent for them, cook them dinner, get them sorted for bed, etc.


In addition to that distraction, we paid a visit to the boys’ surrogate grandmother, Jenna who lives a couple of kilometers away on the mountain. She’s just had a melanoma removed (successfully) and needed some help lifting chook and goat food, so we went for a visit.


So tomorrow it’s into it early to get the last of this course wired and laid, then figure out what I’m doing with the ligatures for the slabs above before I put down the last course.


Um….


It just occurred to me. These ligatures are L-bars which extend horizontally into the slab above the wall. How am I going to wire these in with 300mm lap on the stem bars AND get the top course of blocks over them? Something has to give - I’m not going to be able to reach down 300mm to wire the bottom of the ligatures through the blocks, and there’s no way I’ll be able to maneuvre the blocks over the bars.


Something to sleep on I think, with any luck a solution will present itself in the morning :)


The end is in sight!


The rest of the steel wiring didn’t take as long as I thought it might, and either I’m getting better at laying these things or I got a lucky run of right-sized blocks because I got my next two courses done faster than I thought.


Working at height hasn’t seemed to have slowed me down all that much; it’s forcing me to be more efficient, so rather than returning to the pallets for each block I’m measuring and selecting 5 or so blocks at a time, lining them up on my plank and climbing up to lay them. Much faster :)


So it’s ten courses down, and now I’ve got more horizontal rebar to wire up. With any luck I can get the wire ties made up tonight and then be back on site tomorrow afternoon (after the boys’ swimming) and get another course done!


Looks like I may get this thing finished this weekend after all :D

Saturday, March 10, 2012

Yawn

I’ve decided the hardest part about owner-building your own house is definitely getting out of bed before sunrise…


I’m so not a morning person :) Now, where’s that coffee…

Friday, March 9, 2012

Cursed steel!

Curse this steel reinforcement!


In order to ease the construction of the lower courses of the retaining wall, I cut the stem bars to 2.0m height so I could lift the blocks over the bars while standing on the ground. However, the wall needs to be 2.5m high so I’ve got another 1.0m of stem bars to cut and wire up (allowing for overlap) at precisely 2.52m total height before I can lay the remaining 4 courses.


This is taking a while - 3 hours so far to do just over a third of the wall. It’s complicated by the fact that I now have to work on a scaffold … of sorts, actually a plank on broken concrete blocks…


I had hoped to get the Hilux alongside the wall as a moving platform, but there’s just no way it’ll fit between the wall and the pallets of blocks. Bugger.


I WILL get this wall finished this long weekend, though…


8 down, 4 to go. The toughest 4…


Number 7! A little delayed this morning due to an issue at work that needed my attention, but into it anyway…

Wednesday, March 7, 2012

Long weekend!

Yay!! It’s a long weekend in Victoria this weekend, so I’ll have 4 days (well, 3½ given the kids have their regular Sunday morning swimming comp in Yarraville) to attack the wall and make some progress. The weather is looking promising too!


I’m paying Ewan to make up wire ties for me at the princely sum of 10c each, so the task of wiring up the steel rebar should be made much faster with less stuffing around. My inner optimist wants to believe I can get the remaining 6 courses done this weekend after all :)


Sketchup is paying more dividends too - with the wall approaching its design height I’ve been thinking about how the rest of the building interfaces with it - the roof above the pump room and the slab above the shipping container in particular. By drawing in all the rebar and the ligatures for the first floor suspended slab I’ve realised that I’m going to need more of them for the slab above the container, and threaded rod in the other end of the wall to attach the roof structure above the pump room (which I’ve yet to draw at all).


Honestly, without something like Sketchup I don’t think I’d be able to preempt stuff like this, causing tons of rework and workarounds later in the piece. I’m starting to realise too all the detail I haven’t drawn yet which is probably a good thing :)

Sunday, March 4, 2012

Play resumes, 2 for 150

Since I got so little done yesterday with the weather I decided that I’d make another trip with #1 son up to the house site today after the boys’ regular Sunday swimming comp to get some more done. Thankfully all the rain has been and gone, although you can see just how much we got by the extent that the driveway has washed away… :(


Ewan was a great help today, it just goes to show how much more I can get done with an extra (albeit small) pair of hands. He made himself busy cutting and bending up tie wires, denailing the second hand pine, brushing down the course beds of debris, and just generally being helpful. And hungry, and eating, and then complaining about being hungry again. Growing boys… what can you say. But it was $10 pocket money well earned :)


Progress on the wall wasn’t quite as rapid as I hoped - the fourth course was laid quickly, but there’s been quite a lot of tweaking of the next two courses as the wall grows - more attention paid to the vertical alignment than before and plenty of compensation for the quite surprising variability in the sizes of the blocks. I found one which measured 201mm at one end and 195mm at the other! A few of the odd sized blocks I’ve found uses for in the wall, but not that one…


Two hours in, and another course down:


Another couple of hours, and:


6 courses down, 6 more (and a fraction.. still not sure what I’m going to do there) to go. I managed to get 4 done this (truncated) weekend, and the optimist in me wants to think I’ll get the next 6 done next weekend but the realist understands that the logistics are going to get a little more complicated as the wall gets taller.


Aside from the problem of reaching the upper courses (I’m going to try and get the Hilux alongside the wall as a moving platform) there’s the issue of propping the wall. I’m confident enough that it’s not going anywhere while it’s still lower than the cutting behind it, but as it extends beyond there’s the risk of it catching the wind. Even with all the reo steel keeping it upright, I still think I’ll knock up some makeshift props just to be on the safe side.


So with all that to do, with any luck I can think about core filling in three weeks.

Saturday, March 3, 2012

Play delayed by rain

Bugger.


It rained pretty heavily and pretty consistently all morning, so very little got done. I hid in the container and cut wire ties, and in between rain squalls ducked out and wired up another horizontal rebar.


I managed to get about half of it done before I had to abandon play in favour of another of the kids’ swimming meets, in Wyndham Vale - this being Huw’s very first real meet and at the very competitive age of 4, the youngest swimmer by a long way :)


Rain!!


Not much building getting done this morning.. the radar suggests it’ll ease in an hour or so, here’s hoping. At least I’ll be able to see how my drainage works behind the retaining wall…

Friday, March 2, 2012

Aaand that'll do me for today


As I hoped, this course literally flew by - the painstaking levelling is paying dividends now, with this course requiring few tweaks with the plastic wedges. Probably half the blocks in this course just sat down in place, perfectly level.


One thing I am finding though is that all blocks are not created equal. I’ve found some are short by a few mm, and some tall by a few - I’ve had two blocks side by side with nearly 5mm difference in height. Occasionally I’ll place a block and it’ll be a terrible fit, and I can swap it with another from a different pallet and that one will be much better. It sure is a pain in the arse (or more accurately, back) lifting the blocks back over the stem bars though…


I wonder if most brickies pay this much attention to detail? :)


Plan coming together

It’s a good feeling when you get to the end of the wall and the blocks all line up with the ones below! :)


I had worried that once I put the stem bars in place (which are all 2.0m high) that I’d have to make up some sort of scaffold or platform so I’d be able to get the blocks over the bars and into place.


Turns out it’s not that bad - the blocks must weigh north of 5kg each but I can pretty easily just lift them up over my head and guide them over the bar and onto the wall. I’m sure it looks a little comical, I probably look like Clyde (the orangutan out of the Clint Eastwood movies Every Which Way …) raising his arms in victory after crapping in a police cruiser :)


Anyway, I digress…

Progress!

Finally, it feels like I’m making progress :)


This course is progressing faster than the second, thanks probably to the amount of time I spent making sure every block was perfectly levelled (or nearly) so I’m spending less time adjusting this course. With any luck the rest of the wall will be quicker again…


Underestimation

I suppose one of the jeopardies of owner-building for the first time and setting a self-imposed schedule, is that it’s really, really easy to under estimate how long it will take to get things done.


Case in point - how long can it possibly take to stack a bunch of concrete blocks on top of each other (without mortar!) and build a wall? Couple of weeks, tops?


Maybe it’s my mostly-hidden perfectionist side coming to the fore, or maybe it’s just that I want to do the job right, or maybe even I’m just crap at concrete lego but this job is taking way longer than I expected.


For example, now that I have all the steel I need to complete the wall I can get stuck into it. “It” being cutting the steel to length, positioning it in the wall, cutting tie wires and bending to shape, and wiring each bar securely in place. This is part of the job of building this wall which is so easy to underestimate - two hours have just been spent doing exactly this, (and I’d done half of the job with the steel I had on hand last week!) and not a block has been laid.


But it’s done now, and I can finally get stuck into laying these blocks and making the wall bigger!

That was fun, let's do it again!


It’s been an hour and a half, but Truckie is finally on his way back up the hill. It took the bobcat pulling (and digging its own holes and very nearly bogging itself!), and half a sheet of the leftover mesh from the garage slab under his wheels, but he’s out of trouble and on his way. I don’t think we’ll try and turn a truck around down there again, just quietly…


Um, this is a problem...

The last time we had steel delivered (for the garage slab) it arrived on a crane tray truck, which was *very* heavily laden with what must have been 20 tonnes of steel. Ours was the first delivery, and after unloading our little order the truckie needed to turn his truck around and get back up the hill.


That was in January, and there had been very little rain so he took his truck forwards down the hill slightly and turned around in the area which will house our worm farm leach drain. This area is not terribly steep, but even so I thought he was crazy for trying that - there’s no way I would have taken that truck down there. He knew his machine well though, and drove straight out and on to his next delivery.


Today, the same guy arrived with our steel but this time ours was the only order. The “boss” wanted to send our order out with the other deliveries for the day, but they were going out on a semi-trailer which wouldn’t have been able to get down to the house site, so our truckie stepped in and brought it up himself. Good man!


As I mentioned earlier in the week we had a lot of rain up here (our dam was nearly empty last week, and now it’s nearly full!) We thought better of turning the truck around the same way as last time as the ground was quite wet, but Truckie came up with a plan and set off to turn around. Problem was, he put his nose too far down the hill and didn’t have enough traction (being unladen) to reverse back up, so he bit the bullet and eased forward to turn the truck around as he did last time. Only trouble is, he doesn’t have the traction to get the truck back up the hill!!


It’s been an hour so far of try-this, and try-that, but all we’ve managed to accomplish is a muddy mess. I think I’m going to warm up the bobcat and see if we can’t pull him out with it…

More steel!

Thankfully the steel has just arrived! Now just need to get it unloaded and I can get stuck into cutting and wiring up the rest of the stem bars - then I can finally get more blocks laid! :)

Into it again

Back on site again this morning, with the aim of making some major progress on this retaining wall. Sadly I have to wait for the steel to arrive before I can start on the wall, because I need to finish wiring up the stem bars before I can start the next course.
Still, there’s plenty to do - I picked up a bundle of second hand structural pine on eBay during the week, and it all needs to be denailed so I’ll get a start on that until the steel arrives. With any luck it’ll be here earlyish this morning, otherwise my progress on the wall is going to be limited…

Thursday, March 1, 2012

Air fittings

So I dropped into Pirtek this morning with the throttle from the air rammer, to get the fittings I need to make up my hoses. I measured the thread (female, and kinda hard to measure.. now there’s a metaphor!) with my thread gauge and digital callipers, and it appeared to match the specs for 1/2” NPT. Thing is, NPT fittings are an American standard and kinda hard to come by here; we seem to use BSP (British Standard Pipe) threads.


Luckily, it turns out that 1/2” NPT and 1/2” BSP are the same thread :) So I now have everything I need to make up the hose for the rammer, bar the actual hose itself. Pirtek had the right stuff, but wanted nearly $80 for a 20m reel. eBay to the rescue once again, $46 delivered from Dandenong for the same stuff…