Friday, December 20, 2013

Commissioning the kitchen!

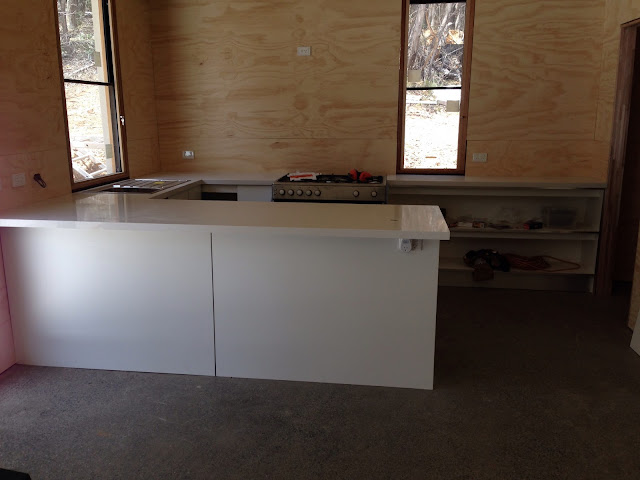
With the benchtops successfully installed it's time to get this kitchen cooking!!


We have a functioning sink!!


After a little fiddling with the position of the gas pipe, the stove is installed and working! This is a major milestone :)


With Savva finished up I turned my attention to another important detail. With something like 30 family members joining us for Christmas, I thought one or two might like a little privacy in the bathroom. What better way than installing a door!

First, the frame. This took a lot of fiddling around to get cut to the right size, then plumb in the (not so plumb) stud frame. I really must talk to the carpenter about that.....


With the jamb set up properly the door went in pretty easily.


I'm getting the hang of using a chisel to rebate hinges :)


Next detail - the door furniture!


Aaand, finished!!

Except.

In my haste I grabbed the wrong lever set from the box. Being the bathroom, I've got a "privacy lockset" for this door to allow it to be locked from the inside. Except I didn't grab that one.. and the one I did grab has a 70mm backset (the distance from the edge of the door to the centre of the door handle). Of course, the correct privacy set has a 60mm backset, doesn't it.. which means I can't install it in this door because the hole is in the wrong place!!

So it looks like I've got a bedroom door here all fitted up. I'll grab another door off the pile tomorrow and try again :)

Thursday, December 19, 2013

Render update

Barrie has been on site this week getting the colour coat on the exterior of the building. It's starting to look really good!!


The only problem is .. Barrie's run out of top coat. And the supplier doesn't reopen for business until the new year, so it'll be a couple of weeks into January before we get the place finished. There are only about three sections left to go, plus all the window sills, but the render isn't holding us up for anything else so I'm not fussed about the delay. It would have been nice to have it finished before Christmas just to have it ticked off, but it's no big deal.

It's beginning to look a lot like ...

... Kitchen!

Today is finally benchtop day. After more than a week of delays I finally have the stone mason on site to install the bench tops. These are a composite product and not actually stone - they're a mixture of crushed rock aggregate set in an epoxy resin of some sort and polished to a high gloss. It looks a lot like stone, but it's stronger and more consistent and (all importantly) cheaper!


I supplied the templates to the stone mason a couple of weeks ago, marked them up and labelled them with A-A and B-B etc. so they'd know how they all fitted together.

However.

I hadn't cut out the sink opening from the template, because the last time I did templates for stone benchtops the supplier wanted to cut the sink out on site, as moving the stone around with a gaping great hole in the middle is a recipe for breakage. I did however scribe the outline of the opening from underneath just in case. And it turned out that they did want to cut the sink opening at the factory, mainly because this composite is stronger than stone and it has a 40mm reinforcing edge.

However!

It appears I've somehow moved the template around after drawing the sink opening, because it's in entirely the wrong spot. Thankfully one of the stone guys spotted the mistake before cutting the stone, and so rather than possibly make a wrong cut they've decided to cut it out on site.

Good decision if you ask me.


Perfect! The hole is in exactly the right spot!
Evidently I'm not too bad at this building caper after all. The walls are almost perfectly square, the cabinets are perfectly level.. so the benchtops are going down easily and fit like a glove.


All done!


The bathroom vanity fits perfectly too :)


It's looking a lot like a kitchen now!


I'm very happy with the benchtops and the quality of the installation is absolutely first rate. There's only one joint in the whole thing, and this is it. Almost invisible!!


This is what we'll likely do with the splashback in the bathroom. The mirror will sit on top of the tiles, and the power point will have to be moved. It's too close to the sink in any case.


While I was here I figured it was time to finish off the vanity cabinet.


Looking good!!

Monday, December 16, 2013

Lights.. camera ..

Hole saw!!

After an awfully uncivilised start to the morning at something-past-five and a mad round trip dash to Craigieburn, I have my hole saw!

And it's made its first hole!


This is how the lights will look in the ceiling (if you stand on your head!) :)


Without the ply, it's ugly...


Hole saw at the ready and positions marked, and the first holes are cut.

However.

The hole saw makes tiny sharp red hot shrapnel, and throws it off in every direction. I'm dressed up like a white Oompa Loompa in my insulation-installer coveralls, with goggles and earmuffs and I'm still getting pelted. Nasty job!


I'm told we have steel-eating ceiling gophers!


Here's the first light unit installed.


It's full steam ahead now!


It's cut about 18 holes in the tin, and this is what the hole saw looks like now. A couple of hours ago and it had teeth...

It's not cutting anything else in this lifetime. I wonder if they'll take it back under warranty?? :)


The switchboard is looking very, very full. And it's not finished yet!


A quick aside - I saw these at Bunnings yesterday for only $55, so I grabbed one this morning. Nice!


But, drum roll please.


We have light!!


I'm particularly pleased with the stair lighting. One of the units has an internal loose wire which I can fix, but I need my soldering iron which I don't have on site. So it'll wait.


Sunday, December 15, 2013

Getting ready for lights

In order to grease the wheels of lighting tomorrow as far as possible, I'm trying to sort out a couple of little fiddly jobs today.

First, the single light above the mirror in the bathroom. The lights in the bathroom are brushed stainless spot lights (supplied with 35W halogen globes; I'm replacing them with 5W LEDs). The vanity is getting a single light, and we're installing a row of three on the ceiling for main lighting.

The units have an odd mounting arrangement, with a little box 25mm deep behind the fixture's fascia. According to the supplied instructions, the little bracket you see in the picture below is meant to be affixed directly to the wall; but if that was the case then the whole thing would look ridiculous with the fascia sitting proud of the wall by an inch.

So ignoring the instructions, I've made up a little recessed mounting arrangement using scrap ply. This is 12mm thick, so two pieces will almost exactly match the required depth.


The light mounted in place. Tidy!


The ceiling unit is the same arrangement - but this time it's going in the tin, so a slightly different mount is required. Lots of contortion and colourful adjectives in the roof space went into the cutting of this hole...


.. but it's worth it!


It's about now that I realised I don't have the smoke detectors which are to be installed tomorrow along with the lights. So it's off to the hardware.

I thought I'd try the little one in Broadford first - it's close, and what hardware store doesn't stock smoke detectors? Unfortunately although they have plenty, they don't have any 240V hard-wired ones - they're all battery operated. Even more unfortunately for me, the building code requires that new buildings are fitted with hard-wired, 240V smoke detectors...

Kilmore Mitre 10 isn't all that far down the road. Let's try there.

They have stacks of battery operated, but one only 240V unit - I need two. Wallan isn't far away, I'll try there.

Nope - they only have battery ones too. WTF!?

By this time I'm close enough to Craigieburn Bunnings that I might as well make the trip there. They're bound to have heaps.

Nope! Heaps of battery powered, but one only 240V. Thankfully, identical to the one I already have.

So what was supposed to be a quick trip to the local hardware store turned into a three hour epic. But I have my smoke detectors!

Next on the agenda, the lights in the rest of the house. These are all 90mm gimbal downlights, fitted with 9W LED globes. The trouble with downlights is they're designed to mount on a flat surface, not one which is corrugated! So a little creativity is in order...

Scrap 12mm ply to the rescue again!
This is more or less how the ply will be positioned on the tin.

It's right about now that I've realised I don't have a 90mm hole saw...


The production line
I was only just there, but I'm going to have to make an early, early morning dash off to Bunnings to buy a hole saw. They open at 7:00am, and as I've just confirmed they're 45 minutes away... Nenad will be hear around 8-ish to start work, so it looks like I'm getting an early wake up call!