Saturday, August 25, 2012

Trials and Tribulations, part 2

I think I spoke too soon about finding a replacement idler assembly. Poking around on a few heavy machinery Internet forums, I managed to find two suppliers of parts for Mustang bobcats:


  1. An Australian company who appear to be the official distributor of Mustang parts in this part of the world; and

  2. A slightly dodgy-looking web shopfront of a US-based Mustang and other machine parts supplier.

Both have listings for the idler assembly I need; the US store listing the part as in stock and available for US$160 plus delivery. The Australian company however typically won’t give me a price online, and I have to register a (business) account to get a quote. Oh well, needs must.. and I’d rather deal with a local supplier in case anything goes wrong with the transaction.


Rather surprisingly, once they manually approved my account request and I was able to request a quote, they got back to me pretty quickly with a quote: AU$600, plus GST!


Ouch!


After I recovered from the shock, I pointed them towards the US price I got online, but they wouldn’t budge very much - AU$500 plus GST was the best they could do, and even then they had to order it from the US themselves.


Any wonder our trade deficit is what it is.. years gone by we’d have had the expertise in Australia to .. you know, manufacture something as simple as an idler sprocket assembly but now …


So anyway, as much as I’d prefer to support an Australian business, if all they’re doing is shipping my $$ overseas then I’d rather do that myself, and ship less of them. So with that decision made I gave my business to the US shopfront.


Oh, sorry. Attempted to give them by business. Like many Americans, they have no concept of the world outside the 48 mainland states… shipping to Australia was much too much for their web site to cope with, and so I was left to try to contact them and get a quote manually.


Two emails, a phone call and three days later, and nothing. So much for customer service.


Enter my last resort, PriceUSA. This is a small Aussie business run by a work-at-home mum in Bendigo who has agents in the US who buy goods on consignment, then ship them to Australia at cost. I still don’t know how they make their money, but their service is second to none and I was able to order the part through them, and the store shipped to PriceUSA’s agent in the US who then forwarded it on to me. Under two weeks to my door for less than AU$300. Win.


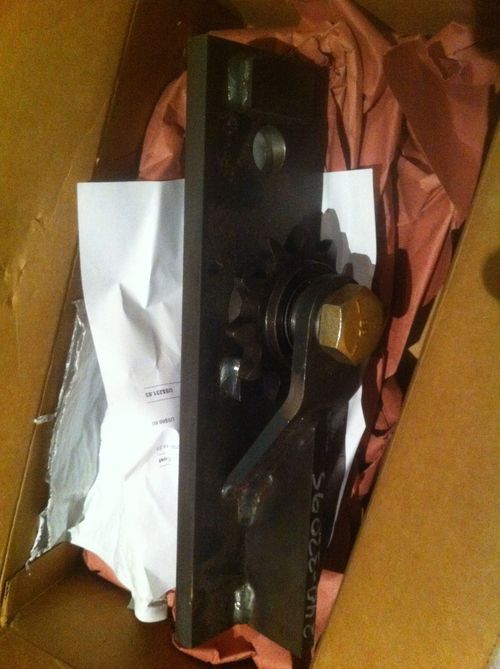
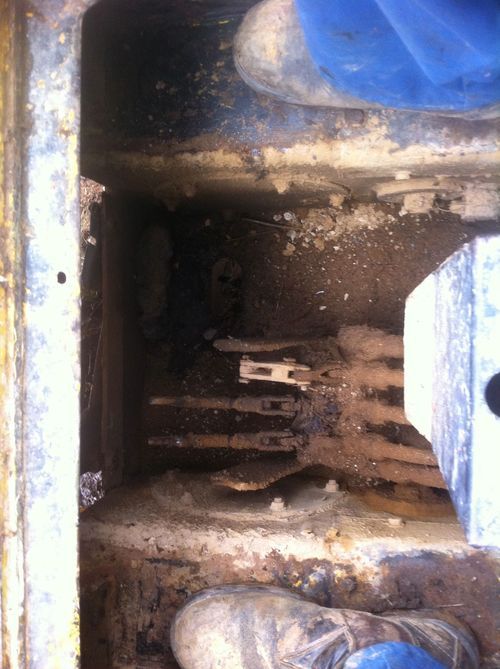
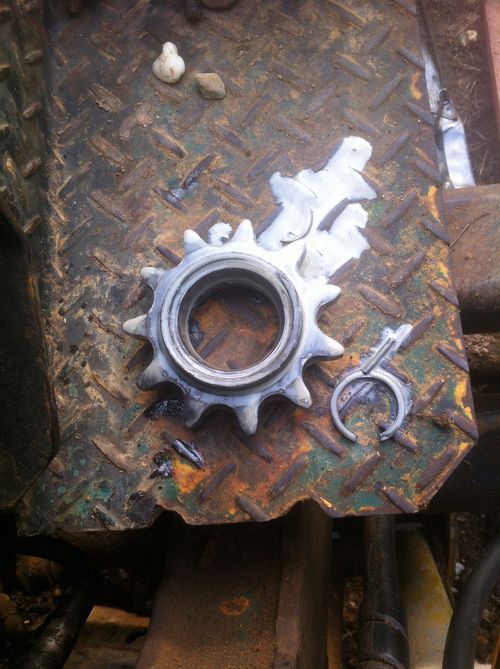
This bit is significantly stronger than the one which broke - they’ve obviously had this idler fail repeatedly over the years, so they’ve revised the design to support the sprocket axle at both ends.


But at least, now I have it in my hot little hands I can get it fitted next weekend! :)

Saturday, August 18, 2012

Trials and tribulations

It’s been a few weeks since I broke the bobcat, and I’ve been fighting all this time to get it back up and running again so I can get back into the building groove.


My first problem was getting the machine apart, to figure out what was wrong. I have a service manual for it (which was an effort in itself to find, but the Internets came to the rescue) but typically, the illustrations are of a brand spanking machine (not one which has done twenty years hard labour, with the associated … “repairs”) and the instructions assume the machine is in a dry, level workshop, not stranded at a precarious angle on the side of a muddy, sodden hill.


For example in order to gain access to the chain case covers, first you must remove the floor panels, pedals, seat, steering yoke and the assemblies to which it attaches. Easy, according to the manual - simply raise the lift arm and engage the locking pins (which are suspiciously absent on my machine) and you stand in front of the machine under the lift arm with all the bits within easy reach. My problem, though, is that the machine is stuck on the hill with the backhoe attached to the lift arm, and the stabiliser feet are really the only thing keeping it from succumbing to the forces of gravity. So even if I could remove the backhoe (which I can’t because the bobcat needs to move in order to do that) I need it to stop rolling down the hill, since the brakes have never worked even a little bit.


So, I’m left trying to disassemble the machine literally right underneath me, since I have to climb into it to get close to the bits I have to remove. I’m getting quite good at impersonating a pretzel…


Oh, and then… this machine is filthy!! The guts are chock full of oily, gritty yuk and every surface is caked in the stuff. Getting it out is an exercise in patient  contortionism, scraping and suction, in that order. And it has to come out too, because I can’t open the chain case until it’s all gone lest I contaminate the mechanicals.


The vacuum cleaner will never be the same again…


Anyway, a little later on and I could finally see what I was dealing with.


Two things struck me about what I found:


  1. The chains (both primary drive and secondary) appear to be intact, and remarkably in pretty good condition.

  2. The oil bath I expected to find in here looks a lot more like a mayonnaise bath. Who says oil and water don’t mix?

Draining out the … er, oil, for want of a better description left me with 15L of android blood:


It took a bit of fishing around upside-down in the chain case, but after I could see the bottom of it, voila!


One idler sprocket! I also eventually found the two bearing cages and half of a one-inch-diameter, grade 8 high-tensile bolt. What appears to have happened is that the continual tension from the chain on the idler sprocket has caused a fatigue failure of the bolt, upon which the bearing and sprocket run. It’s a daft design - there is no support for the inner end of the bolt-axle, so it has been free to flex over the years until it finally gave up with a bang.


So now I have the job of finding a replacement idler assembly. Thankfully, every part in the book has a unique part number and so I actually stand half a chance of finding a supplier and ordering the correct replacement.

Saturday, August 4, 2012

BANG!!!

Uh-oh… that didn’t sound good.


Digging on the side of the hill as I am has been a bit of a fight against gravity. as I’m digging downhill the backhoe bucket tends to pull the machine towards the excavation, so I’m constantly backing up a little, or at least trying to. The ground is still pretty soft so it’s difficult getting traction, but it’s been manageable… until now.


Something just broke in the guts of the bobcat, and I’ve got no drive on the right hand side. The engine and hydraulics are still working fine, but the T-bar steering control is giving me nasty graunchy feedback to go along with a similar sound from the chain case on the right.


I reckon I’ve broken a drive chain :(


This is going to be fun. There’s nobody local who I can bring in to fix this, and although I’m quite mechanically minded and work on my own cars, I’ve never had to work on anything quite this big and all of my tools are somewhat smaller than I need for this.


Oh, and its position is a bit of a hazard, too…


With the functioning hydraulics I do have the ability to use the backhoe stabilisers to lift the front of the machine up off the ground and somewhat level, so all is not lost. I have the service manuals for the machine, so with some study I should be able to find my way into the chain case and investigate.


So if it’s not the weather causing a delay, it’s something else…

Logistics

I made a start on the excavations today, hooray!! It’s good to finally feel like I’m getting somewhere for a change.


There’s a lot of soil to move though, and the question arises: Where do I put it? The backhoe has a very limited reach and I don’t have a tipper truck to cart it away. I do have the Hilux and briefly considered using it, but it would very likely become a “tipper” itself and fall over down the hill.


So I don’t yet have a very good solution to the problem.. at the moment I’m just restricting my excavation to one area within reach of the edge of the site, so I can keep the soil in one spot which I’ll bulldoze out of the way later with when I swap out the backhoe for the bucket.


About an hour or so’s work. Not bad :)


A-digging we will go

So with fine (albeit cold) weather on the weekend I got set up to start excavating the hillside pad for the upper slab-on-ground.


The first job was setting it all out - measuring, pegging, measuring again, repegging.. it took all day Friday but I finally have the site set out and all my levels marked.


What made the set out a little more challenging is the fact that the hillside slopes in two directions relative to the slab, so it’s not a simple matter of measuring a rectangle on the ground and cutting it out. If I want to maintain a level pad in which to dig the foundations for the slab, the cut needs to be made on an odd angle. I had anticipated this having drawn the cutting in Sketchup, but naturally the actual slope of the hill varies somewhat from my model and so it came down to measuring the level with a string line until I found the right line.


If I had ready access to a rotating laser level this job would be much easier, but I don’t so it’s being done the old fashioned way :)

Thursday, August 2, 2012

To dig, or not to dig?

That is indeed the question. It’s been a relatively dry week if very cold this week, so I’m taking the opportunity of getting the rest of the backfill pebble delivered tomorrow while the ground is dry and I’m in little danger of bogging another truckie.


The question though is whether or not I’ll be able to start the excavations for the upper slab-on-ground. It’s going to be fun if the ground is still as soft as it was last week, and even with a machine as manoeuvrable as the bobcat there’s not a great deal of room to move.


Still, if I’ve learned one thing during the project thus far it’s that I really must take advantage of the weather when it presents an opportunity, if I’m to stay anywhere near my schedule… so I suppose that means I dig! :)