Thursday, May 31, 2012

All systems go

All systems are go for another wall panel this weekend. The weather looks like it will cooperate, there’s been little rain during the week and the forecast for Friday and Saturday is dry, with no rain until Sunday.


Cold, but dry :)


Shame about the lack of daylight hours though - we’re getting close to the winter equinox solstice (thanks Caro!), which means about 9-and-a-half hours of daylight…

Sunday, May 27, 2012

And so it was

The rain on Friday was impressive! It began shortly after sunrise and just didn’t stop… so precisely nothing got done.


Next weekend…

Wednesday, May 23, 2012

Ugh

So says the Bureau of Friday:


Cloudy. Rain.


..and of Saturday:


Cloudy. A few showers until late afternoon.


Somehow I don’t think I’m going to get very much done this weekend…

Sunday, May 20, 2012

Finally, a day according to plan!

After an early night in preparation for an even earlier morning, I got stuck into the wall around 7am once it was light enough to see what I was doing.


First job was to drag King Kompressor out of the container into the cool daytime air, in order to prevent a repeat of last week’s performance (or lack thereof).


Wow, this thing is heavy!! I had to squeeze the bobcat into the space in front of the container and pop a vein manhandling it onto the bucket, in order to get it out. I really, really must put some wheels on this thing…


With that done I got stuck into mixing the first batch of the day. With the lessons of last week fresh in my mind I made up a full cubic metre and wet the mix down slightly more than I otherwise would, in order that it last a few hours without drying out too much. I fired up the compressor and started ramming around 8:15am.


A little over an hour, and one course of rammed earth later Coda went off his nut at the approaching car - last week with John helping he mentioned that another resident on the mountain, a young guy named Scotty (who I’d met last year when the creek flooded and trapped us on the hill) was interested in building and would like to see what we’re doing. I’d suggested that he’s welcome to come by, and so here he was.


Hospitality slowed things down for a little while as I explained everything which was going on, but after a coffee I got stuck back into it with Scotty having a go on the rammer.


So far, King Kompressor behaved himself :)


Around 11:30, John came trundling down the hill to lend another hand. Bloody legend, this man is!! Scotty left around midday, and then between the two of us we worked our way up the wall steadily, reaching the top of the fourth course of forms in what must be record time, by around 4pm. With one more lift of forms to go, it looked like we might even get finished in the daylight for once!


Well, almost.


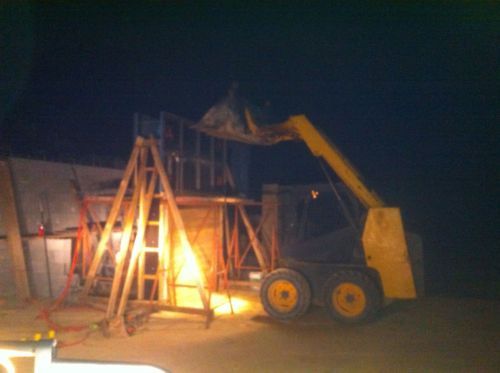
We hit 2.52m just after darkness set in around 5:45pm, then spent the next hour or so stripping the forms and packing up to the light of the Hilux and (showing my improved  preparedness) a 500W floodlight :)


Aside for a light shower mid-afternoon, pretty much nothing went wrong today! The compressor ran all day without a hitch (aside from running out of fuel once, which gave me a minor coronary). We had one clamping bolt come a little loose at one stage, but we caught it fairly quickly before any damage could be done.


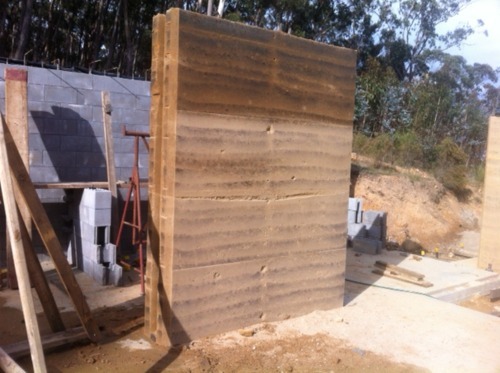
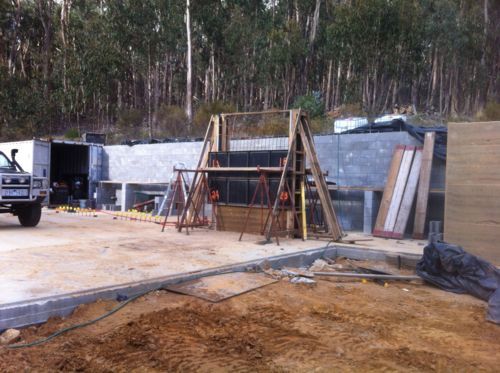
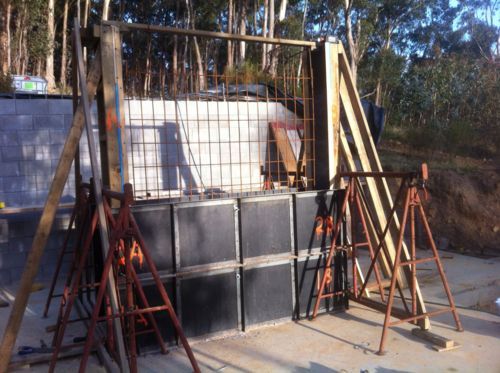
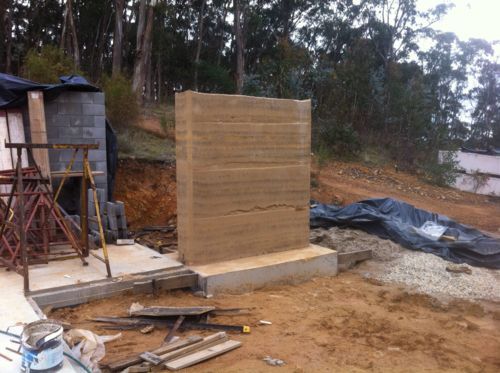
The result. From this:


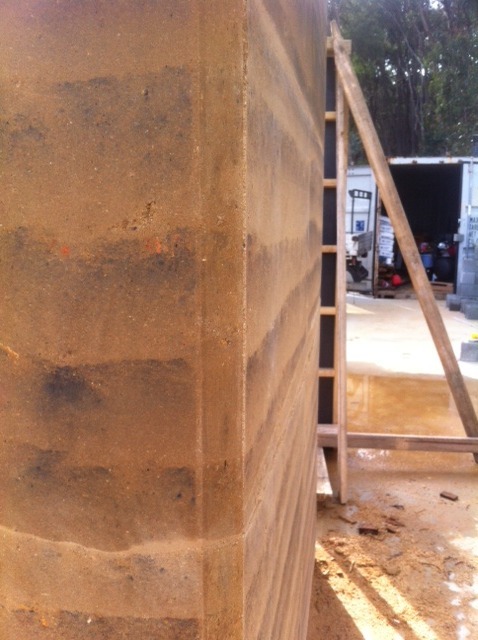
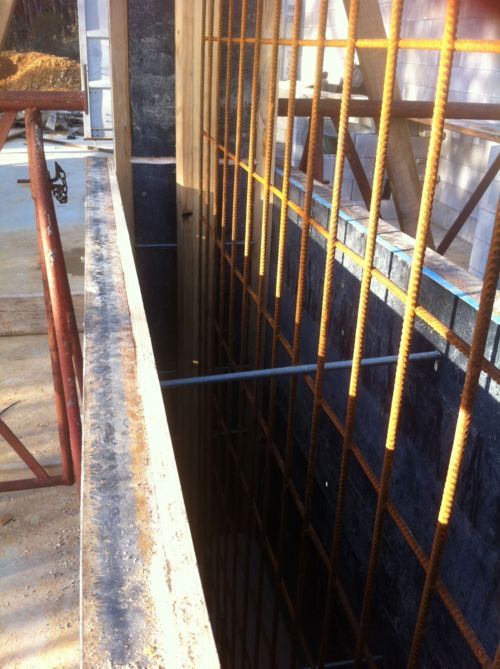
to this, in the space of around 11 hours:


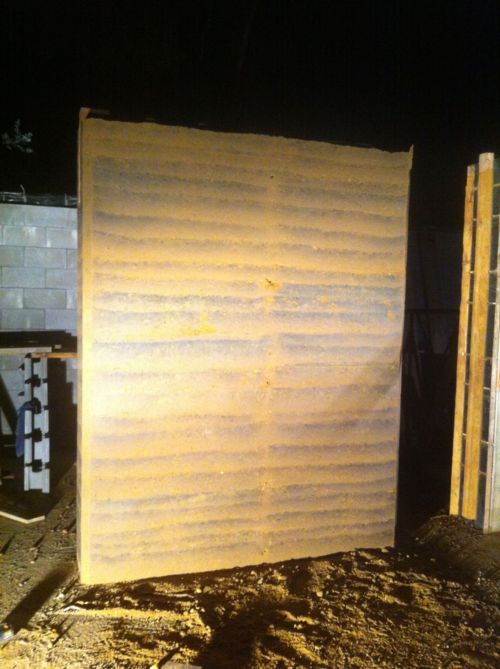
To say I’m happy with this result is a minor understatement :) This panel is easily the best so far, with very little tear-out and no serious flaws. At one stage (I think it was the second batch) the mix was a little too damp which is currently visible in the surface finish as a slightly “waxy” appearance, but as it dries I’m confident this will disappear. The too-damp mix also stuck to the forms a little bit in places, so it might pay to lightly wipe them down with oil (apparently engine oil is the go) next time as a preventative.


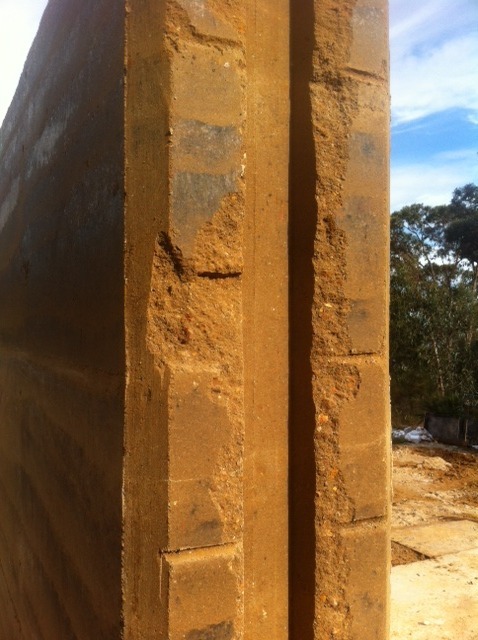
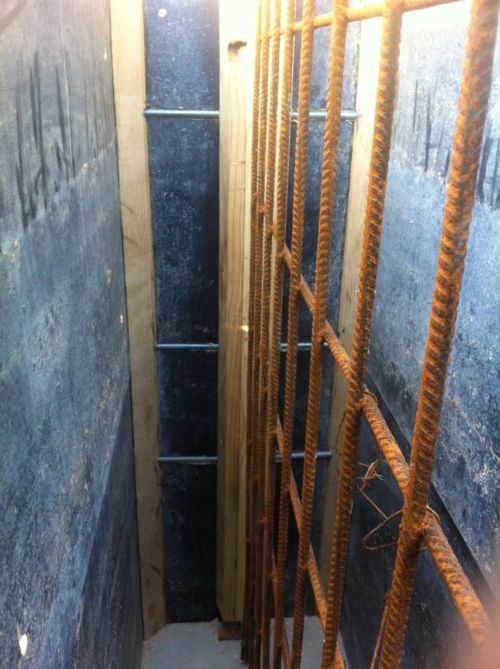
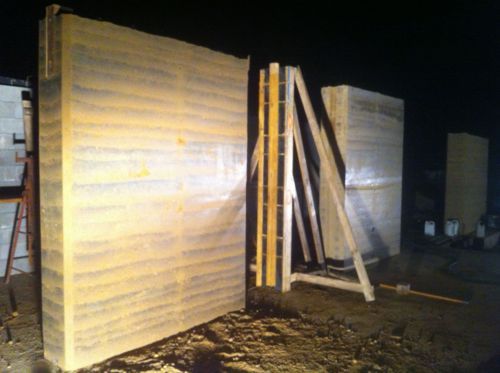
This is my favourite bit, however:


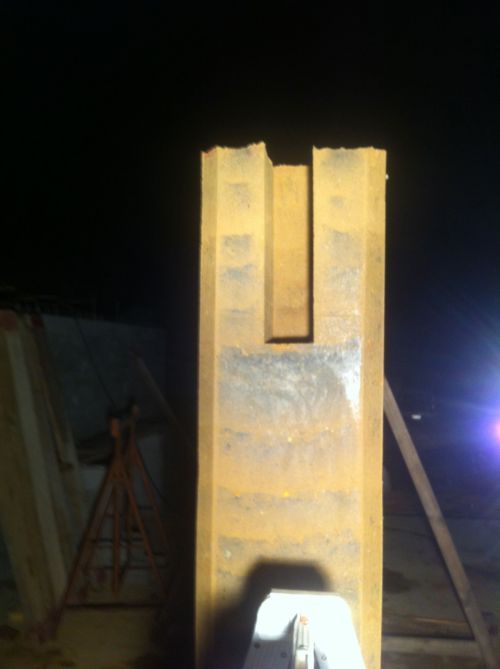
This is the rebate for the lintel above the doorway, which was formed by the big lump of Kauri pine that I moulded up a few weeks ago. The two-part design worked absolutely brilliantly, with the forms coming off easily and the pine coming apart and out of the wall without the slightest hint of tear-out. The edges of this rebate are so perfect.. it’s just such a shame that they’ll never be seen. Once the opposing panel is rammed and the lintel is installed, the rebate will get filled in :(

Friday, May 18, 2012

So. Much. To. Do!

Let’s see, what did I get done today…


  • 07:00 - Ate breakfast (a somewhat rare event for me unless I’m building) then made a mad dash into Kilmore to pick up 42 bags (840kg!!) of off-white cement. I have enough on hand now to do the whole wall :) Boy, the Hilux is twitchy when it has its nose pointed at the sky…

  • 10:00 - Stripped the formwork from last weekend’s wall panel. I had planned to revisit the site on Sunday after the boys’ swimming comp, but Ewan had a 1500m time trial to attend in Richmond so that put paid to that. (As an aside, I am incredibly proud of Ewan, he swum the 1500 with incredible consistency - his first 100m in 1:55 (or close to that) then every other 100 bar his last he did between 2:05 and 2:08. His last 100 was 2 minutes dead. He looked as fresh afterwards as when he dived in.. incredible!)


I’m really very happy with this wall panel, even though it has a few imperfections. It’s pretty straight, (straight enough that you can’t easily see any bulging, although with a straight edge you can find it) and there’s remarkably little tear-out. The top bit is still wet from the forms..


This is the worst of the tear-out - the column with the tongue timber was rather difficult to disengage from the wall, and it took some wall with it when it finally did let go. I’m not worried about this though, since this face is a joint with the next panel and nearly all of the tear-out will get filled in.


  • 12:00 - Cut and wired in place the steel reo mesh, ready for inspection this afternoon. Which didn’t happen. I got a text from the inspector this afternoon asking me to take photo’s, as he’s in hospital having done his back in (again).

  • 13:00 - Began reassembly of the forms in place for the next wall panel. This takes aaaages - although I’ve only just drilled all the holes in all the right places, nothing lines up easily. Mucho adjustment later and it’s all assembled, square, braced and plumb.

  • 17:00 - With darkness fast approaching, finished bolting up the form panels and jumped into the bobcat to screen another load of soil ready for ramming in the morning. Successfully managed not to tip the bobcat over onto its nose this time…

  • 17:45 - It’s nearly dark but we’ve run out of firewood at home so I have to cut some today else we’ll freeze next week. So, changed the chainsaw chain and got stuck into a fallen tree halfway down the hill. Wow, what a difference a sharp chain makes!! I could barely hang onto the saw and it cut foot-diameter logs like butter!

  • 18:15 - Loaded up the Hilux with the firewood and the spare water tank as I’m just about out on site, so I’ll cart another 1000L up from Melbourne.

  • 19:00 - Finally sat down with a beer at the Tallarook Hotel, awaiting the Roast of the Day (pork, as it happens, and gravy nearly as good as mine) :)

I’m determined to get the next panel rammed tomorrow, and waaaay before 9pm this time (compressor willing) so I’ll be starting my day in the darkness…

Wednesday, May 16, 2012

So, do I trust it?

This is the big question going through my mind this week. How much do I trust the compressor not to fail if I attempt another wall panel this weekend?


I’ve got to get up to the site on Friday anyway, to strip the forms from the finished panel and reset for the next one, since I have to have the steel reinforcement inspected for each one (crazy, they’re all the same - and why would I want to take a shortcut?) and need to give them notice, so that’s booked in for Friday arvo.


But do I trust the compressor?


The short answer is no, but what choice do I have but to press on? It seemed to run reliably enough once it was dragged out of the shipping container into the cool evening air, but how will it like putting in a solid 10 hour day? I have no idea.


Only one way to find out, I suppose. I’m not about to run the thing for hours on end just to test it, so I’ll be back into the ramming at first light on Saturday. If I’m going to have a shred of a chance of keeping this project anywhere near on target, I’ll just have to plough on and hope for the best.

Saturday, May 12, 2012

Done.

Given the events this afternoon, I almost can’t believe we’ve managed to finish this wall. It’s 9pm, the wall is precisely 2520mm tall and although I can’t get a good photo in the darkness, take my word for it - it’s a thing of beauty.


I know he’ll never read this (he doesn’t even own a computer) but John, you’re a bloody life saver. Without your help I’d still be on top of that bloody scaffolding with a crow bar and bleeding blisters. Craig too, thanks mate for coming to the rescue with the compressor. I still don’t know why we didn’t need it, but I’m thankful it was there as insurance.


One wall panel down, three to go.

Cold!

It’s getting pretty bloody cold up here!!


The final form placement is done - it was a bit tricky doing these last ones as they only engage the columns by 200mm or so and need to be braced solid but we’ve managed it and are on the home stretch.


I can’t imagine being able to build these walls without the bobcat. Up to the 4th course I’ve been able to pour soil into the forms using the bobcat alone - I can tip the bucket into the first three courses, and I’m able to get the bucket over the top of the 4th and then open it. This means we’ve only needed to shovel soil into the final course, and that’s only ramming down to 120mm deep so it’s not much penalty at all.


Nearly there!!

We’re getting close now, approaching the top of the fourth course of forms, or about 2300mm. Time to move the last panel into place in order to get the final 120mm done above the 4th course.


Craig has very kindly delivered the Kennards compressor, and had a go with the rammer. There’s something terribly cathartic about this building process, it’s hard work but very rewarding seeing the results revealed when the panels are moved.


With any luck we won’t need to find out if the Kennards unit will drive the tamper…

Light is fading..

.. but we’re making progress again. Moving the forms with John’s assistance was much, much easier than doing it solo and honestly, I don’t know how I’d do it by myself anyway.


After the compressor cooled and we moved it outside, it started again and so far it hasn’t stopped. I’ve been mixing up a new batch of soil while John rams with the tamper and things are moving along again. It’s starting to get dark though and we have about 800mm of wall to go but there’s light at the end of the tunnel.


Oh wait, no… that’s the Hilux :)

OK, no I'm not

I’d be lying if I said I was surprised, but I’m not - the compressor has stopped and locked up hard again. It doesn’t feel like it’s overheating - the compressor stage is hot, but not too hot to touch and it has a fan built into the drive pulley anyway. The engine doesn’t smell hot either so I don’t know what’s going on, but I suspect it’s heat related as it seems to go again once it cools. It’s not like it’s hot here either, it can’t be more than 10ĀŗC.


John has just arrived and is hell bent on lending a hand, and even though I told him in no uncertain terms that I couldn’t ask him to help ram by hand that’s exactly what he’s doing. This man is a bloody legend!


We’re going to drag King Kompressor out of the container and see if it runs more reliably outdoors. It’s currently in the doorway and it’s very slightly warmer in there than outside, but I will admit to a small margin of desperation at this point so I’ll try anything.


We’re reaching the top of the third course of forms, probably 1600mm in height so far of the 2520mm total. Time to reset the forms and let the compressor cool, then I’ll try again.

OK, what the..?

Craig is on his way back with a Kennards compressor. They have two types - a two cylinder floor unit rated at 11cfm, and a towable one at 130cfm. Too small and much too big, but I don’t have fittings for the big one so Craig’s bringing the 11cfm one. It may not drive the tamper, but we’ve gotta try.


It’s been a while since the compressor died, and I need a break from the crow bar so I climbed down and had another look at it.


Just for shits and giggles, I turned the key and what do you know, it turned over!!


Spark plug back in and bam, it’s running!


I haven’t climbed the scaffolding this fast, ever! Crow bar - thanks for your help, but sod off. I’m mechanised again!!

Cavalry?

I’ve had a go at ramming with the crow bar, and there’s absolutely no way I’m going to be able to finish this wall this way. And live, anyway.


I don’t like doing it, but I’ve got little choice at the moment so I’ve put some calls out for help. John (who lives locally and helped recover the Hiluxes a little while ago) is making some calls to see if there’s anyone nearby with a compressor big enough to drive the tamper. Our neighbour Craig is about to head back up from Melbourne and will drop by a Kennards to see what they’ve got available at short notice.


In the meantime I have to keep ramming…

Aaaaaaaarrrgh!!

I’m cursed…


I’ve only rammed a few layers this afternoon, and now the compressor has stopped. I first thought it may have been water or other crap in the fuel, as I’ve only just refuelled it and that was from a drum which used to hold hydraulic oil for the bobcat. It was flushed out with old fuel, but still…


But no. I cranked the compressor a few times without it starting, and I (naturally) started to smell fuel in the exhaust. Then when it finally did fire, it backfired with a jet of flame a foot long out the exhaust. It ran for a few minutes, got up to pressure and then stopped.


Permanently.


I can’t even turn the crank with the rip cord, it’s seized solid. I’ve taken the spark plug out to eliminate compression lock, but that’s not it and I can’t turn it at all. It hasn’t done 15 hours work yet!


Shit! Shit! Shit!


What am I going to do now? I’ve got about two thirds of a wall, and I can’t stop now otherwise I’ll end up with a dry joint. I can’t have that! This is a structural wall, and even though it’s got reo in it I get the feeling I’ll have to pull it down and start again.


My only option is to ram it by hand with the crow bar. This is going to be fun…

5mm

That’s about all I was able to close up the panels after scraping out the surface, which I suppose isn’t bad given how densely rammed the soil is. We’ll see how the joint turns out when I lift the next course…

Noooooooooo!

I’ve rammed about two layers since lunch and I’ve just noticed that the centre-top clamping bolt has come undone and lost the nut on one side. The tape measure says it has bowed out by about 10mm total width, which is going to make lining up the next form panel impossible. This will cause a visible crumbly step in the wall, which is precisely what I’ve been trying to avoid by using the centre bolts in the first place!!


I’m going to scrape away as much of the surface as I can down to the bolt and torque it up as much as I can without it snapping (they’re not high tensile..) to try and close up the width of the panel as close to 400mm as possible. Then I’m going to lock two nuts together on each of the bolts so none of the others come undone!!!


FQ!#*$&*#K!!

Batch mixed, forms reset


So this is where an extra pair of hands (or two) would be very useful right about now. It’s taken from about 12:30 until now (14:45) to reset the forms and mix up another full batch of soil. Admittedly, securing the forms took longer than expected - although my measurements yesterday were pretty accurate, the holes in the forms don’t quite line up with the holes in the columns so there’s been quite a bit of fettling required to get everything bolted into place.


One thing I love about building these walls though is the reveal - carefully prising the form panel away from the wall, revealing an absolutely beautiful surface lurking beneath is incredibly rewarding. There are still small imperfections and minor tear-out where the bolts have been removed, but overall I’m thrilled with how the first course has turned out. The layering is really nicely consistent, and I think I’ve figured out what’s causing the black staining - I originally thought it was the brand new film-face form ply leaving some colour behind, but looking more closely at it I think it’s the result of the rubber ramming head leaving marks on the form ply which are being transferred to the earth. There’s less staining in the centre of the wall, probably because the bolts are preventing me from striking the forms as much with the ramming head. Not sure what I can do about this though…

A productive morning

So far so good! I got through the first half batch in no time flat, which rammed down to about two thirds of the first course of formwork, about four or five layers. I’m getting better at measuring out the loose quantity poured into the forms too (having the reo mesh in place helps here, as the horizontal bars are at 200mm centres so it’s easier to keep a consistent thickness).


I had expected that having the mesh in the middle of the wall would be a serious inconvenience - I can’t ram the whole width of the wall from one side as I did with the test wall, but it along with the clamping bolts installed in the middle of the panel mean that I end up ramming the wall in quadrants and it’s actually a help rather than a hindrance. Concentrating the ramming on smaller areas at a time means I’m more consistent with my coverage, which with any luck will produce a better result. Time will tell :) Adding the bolts to the middle of the wall was well worth it - the forms haven’t budged a single millimetre, so this one looks like it’ll be perfectly straight!


So far I’ve used about 1.5m3 of loose mix, which has rammed down to about 1.0m in height. This equates to about a 2:1 compression ratio which is a little more than I expected, but I’ve got plenty of raw materials so there’s no problem.


So I’m a little under half way through the ramming, and it’s lunchtime. The compressor conveniently just ran out of fuel and I’ve used the last of the batch so it’s a perfect time for a break. After lunch I’ll leapfrog the forms, mix up another full batch and get back into the ramming :)


A bit hard to hold the phone and control the bobcat at the same time, but this is how I’m mixing up each batch of soil for ramming. Two full buckets of sand, two of soil, four bags of cement and half a litre of Plasticure in 10 litres of water.

The better part of an hour later...

Bluey on the BYOHouse forums suggested that he was able to mix small batches of soil much faster than doing a whole cubic metre so I thought that time being of the essence today, I’d try that approach and started with about half a metre of materials.


It took me just about as long to mix with the bobcat as doing a whole batch! Maybe I’m doing it wrong, but I reckon I could mix two metres in the same amount of time as a half. No matter, it’s done now, time to get ramming!

Into it!

It’s been a cooooooold night in the caravan, with Coda shivering on his beanbag beside the bed. That’s behind us now, with the sun making a feeble attempt at getting out of bed to start the day. Not as feeble as my attempt, though…


First job: Mix the first batch of earth. Or rather, wake up the bobcat and ask it very politely if it would like to start. If not that’s OK, I’ll just ask Mr. Aerostart for his assistance ;)

Friday, May 11, 2012

Everything takes longer...

Everything takes longer than you think. I attacked the formwork first thing this morning with the aim of drilling all the holes I need to mount the panels at each level. Doesn’t sound like this would take very long, just drilling a few holes, right?


Well, at one end this was relatively easy - the holes pass through the 90x45 pine column braces, so yes, these were pretty easy. Measure twice, drill once ;)


The other end however was a bit more of a challenge - this column has the 100x50 “tongue” timber fitted to form a groove in the wall which forms both a control joint and a mechanical connection to the next panel. With the way I’ve set up my forms (in order to minimise the number of through holes in the earth for clamping bolts) the bolts at this end pass precisely through the joint between this and the next panel. This means there needs to be a channel in the formwork in which the bolt will (half) sit.


I should have cut this with the router before I assembled the forms, but I didn’t did I? So instead, I purchased a 14mm auger specifically for this task but I couldn’t find one long enough to cut all the way through. So, I wound up improvising with a 1/4” drive 3/8” socket and extension bar in the drill, which cut just over half way. Meeting the hole from the other side however was more of a challenge than I was capable of most of the time, so the bars will have to be wound (or bashed) through in about half of the cases. With any luck I’ll be able to minimise the amount of tear-out of the earth panel.


Seriously complicating all of the above is the fact that the batteries in my drill don’t last very long. I had the generator running pretty much all day, charging the spare battery (but never all the way before I needed it). I spent more time changing batteries than drilling holes, it seems.


So it was getting dark by the time I had the formwork finished. Just enough time to screen a few metres of soil, which was an adventure in itself as I overbalanced the bobcat with a very full bucket at full height, and gently tipped it over onto its nose and came to rest on top of the soil screener. Emptying the bucket had the machine very gently right itself, the rear wheels coming back to earth with a soft thud. Alissa had arrived with the kids shortly before so I’m sure I gave her a bit of a fright, me hanging by the seatbelt…


Oh yes, the photo’s. Here’s what took me all day…


Here you can see the clamping bolts rebated nicely in the column.


Oh yes. One lesson I learned from the test wall is that the panels will bow outwards with the pressure of ramming, regardless of their strength. To prevent this, I’ve decided to compromise my hell-bent aversion to holes in the wall by installing a clamping bolt half way along the panel’s length at the top (and also the bottom of the first panel). There’ll be a hole to patch, but at least it’ll be in a straight wall ;) I’ve also decided to install two courses of panels bolted together at the beginning, rather than start with only one course. This should add to the strength at the cost of inconvenient access for the first few layers.


So I’m all set for a start at sparrow’s tomorrow. For now, it’s off to the pub for dinner with Alissa and the kids :)

The real forecast

The forecast for this weekend, issued by the Bureau of Ownerbuilderology:


Earth, rammed with periods of sweat. The chance of an expletive by late afternoon.


I’m determined to get the first real wall panel up this weekend, weather be damned.


First on the agenda today is to set everything up ready for ramming at first light tomorrow. One thing I learned doing the test wall is key - preparation, preparation, preparation. The more I can get ready today, the smoother the ramming will go tomorrow. I already have the formwork columns and steel reo in place, so today the plan is:


  1. Clear the work site so there’s nothing in the way to trip over or run into.

  2. Get the forms bolted up and all the holes drilled for the clamping bolts so there’s no stuffing around with this tomorrow.

  3. Set up the scaffolding so it’s ready for use when I get to the upper courses.

  4. Screen a metric arseload of soil ready for batching.

  5. Follow up on my order of a metric truckload of concrete sand.

  6. If I have time, cut some firewood to take home with me tomorrow. It’s gettin’ cooooold :)

Wednesday, May 9, 2012

The forecast for Saturday...

I plan to ram the first real wall panel this coming Saturday. This is what the Bureau of Meteorology have to say about it…


Partly cloudy.


(a good start)


Scattered showers from the morning with possible hail.


Uh oh.


Snow showers above 900m, the chance of thunderstorms during the afternoon. Overnight temperatures falling to around 3 with daytime temperatures reaching between 9 and 13.


Crap. Crap. Crap. Crap.


I thought La NiƱa was supposed to be over and the weather getting dryer!? Hail, snow and thunderstorms aren’t fitting the pattern…

Tuesday, May 8, 2012

Where HAS the time gone?

So it’s been a bit quiet around here lately as not very much has been getting done building wise. The sad reality of the approaching winter has begun setting in, and it’s just been too wet to get anything productive done on site.


The test rammed earth wall has cured nicely in the humid (read: wet and miserable) weather. It hasn’t lost all of the black staining from the virgin formwork, but I think with a little attention I could get rid of it easily enough. The natural colouring of the local soil has come out nicely though, and I’m very happy with the end result.


The Plasticure additive has worked brilliantly, too. While the ground around the site is sodden and mucky, the wall is literally bone dry even though it’s been exposed to all the weather. I didn’t get a photo, but the area I used to mix the batches is dry too, with little puddles of water pooling in the dry, hydrophobic soil below. Good stuff.


One positive side effect of the hydrophobia which I hadn’t anticipated relates to the steel reinforcing mesh which will be encased inside the for-real wall. I had originally attempted to buy galvanised mesh to prevent “concrete cancer” (where the mesh rusts, expands and causes the wall to crack) but it’s not easily available off-the-shelf, and getting regular mesh galvanised costs a fortune. I had toyed with the idea of paying the boys a little pocket money to slap on cold-gal paint, but the Plasticure solves the problem entirely since no water can get anywhere near the steel mesh — so it isn’t going to rust, galvanised or not. Win!


Anyway, I digress.


About all I was able to get done on site this past weekend was preparation for ramming the first wall panel. I haven’t been able to get a delivery of sand on-site due to the wet ground, but with any luck I can arrange that this week and get a wall panel done on Saturday. So, in preparation for that I’ve erected, plumbed and braced the first set of forms and reo mesh all ready for a building inspection on Friday.


Ramming this panel with the mesh inside is going to be a sod of a job. The pneumatic ram doesn’t like striking anything other than soil, otherwise it misfires and farts around like a cold Mini with the choke in. Even with the wall at 400 wide there’s not a great deal of room to wield the rammer beside the mesh, so I foresee a pair of nicely bruised hands in my immediate future…