A busy, busy day today prepping for the earth ramming tomorrow and taking care of all those little “do it later” jobs. First priority was finishing the assembly of the formwork - fixing the second set of corner chamfers, and sealing any gaps with silicone to prevent earth getting caught in behind and tearing out when the forms are removed.
With that done I bolted the retaining bracket to the new slab - it’s only a week old and quite surprisingly, it’s still pretty soft. China’s Finest Hammer Drill sailed through the holes as if they were in timber, but the dynabolts went in and gripped well so it’s hard enough.
Time to erect a column, then! :)
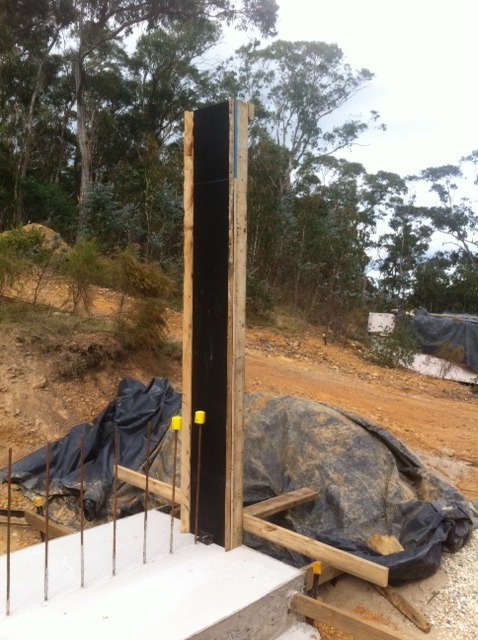
With the column bolted to the slab via the dynabolted bracket, it was surprisingly solid even without any props. Not quite plumb though and with a bit of a breeze it was time to prop the column solidly in place and plumb it properly.
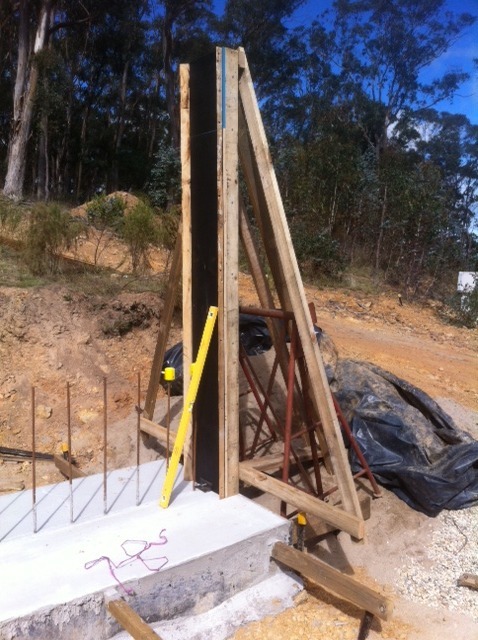
Because I’ll be building the for-real rammed earth walls in the middle of the garage slab, my columns are designed to be erected without needing any fixtures other than the one bracket at the end of the wall, which is captive and remains in the wall once it’s rammed. This test wall however is within reach of the ground, so since I’m unable to brace the props against the slab I used star pickets and tek screwed them to the props. (An aside - if there’s been a better invention in the last 50 years than the Tek screw, I’m yet to see it!!)
I learned a lesson erecting the first column - attach the props while the column is on the ground, rather than having to climb 2.5m into the air with timber, drill and screws…
Second column coming together:
With this second one I have to address one of the little gotcha’s - there’s not enough space to install the column at the level of the new footing, since it’s lower than the top of the slab. The solution turned out to be very simple - a piece of 70x45x400 pine screwed to the bottom of the form to take up the Hebel’s rebate space. There’ll be a bit of an imperfection in the surface finish (the pine is straked, not smooth) and there’s no chamfer, but since this end of the wall will butt against the installed Hebel they’ll never be seen. Win.
With that sorted, I waddled over to the footing carrying the second column upright (damn, these things are heavy!!).. and both columns are now firmly fixed in place. I began plumbing the second column as I did the first, but then realised that since I have the one column perfect and they are precisely 2.0m apart, I could simply place a spacer at the top of the columns and then brace the second column against that. Much easier! :)
As the wall approaches full height I’ll simply remove this spacer - it’s just sitting there - and the wall will provide the bracing itself.

I’m quite pleased with the installation of the columns - they’re very rigidly located and I’m confident there’ll be little movement during the ramming tomorrow (famous last words I’m sure!)
I managed to get one set of holes drilled for the clamping bolts, and will drill the rest as I build tomorrow.
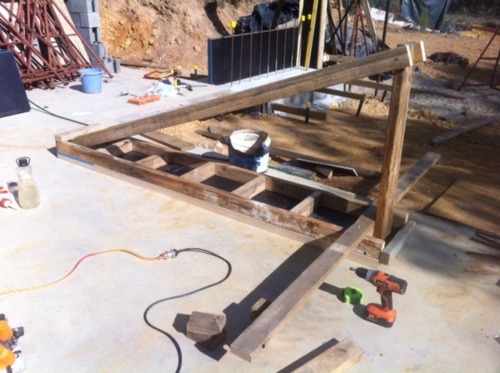
My other job for today was to build a metering box, which will help me maintain a consistent earth mix between batches. Yet again, Sketchup to the rescue! :)

I’m expecting to need a 2:1 sand:soil mix, but I may be able to get away with 1:1 so the box has a divider which can be moved to accommodate the different ratios. I’ll just fill it to the top with the bobcat on a flat surface (if I can find one!), then dismantle the box and mix the two components with the 4-in-1 bucket, lifting and dumping the mix until it’s completely blended.
I managed to get most of the timber cut for the box before I ran out of daylight, so I’ll have to finish it at sparrow’s fart tomorrow.
No comments:
Post a Comment