Tuesday, September 25, 2012

Rammed earth, a few months on

So it’s been a few months since I completed the rammed earth walls, and it’s been interesting watching them evolve during the winter months.


The first and most obvious change has been that the “tiger stripes”, which ended up being a film of rubber left behind by the rubber ramming head on the pogo stick, have faded almost entirely in the weather. I’m still a little undecided as to whether this is a good thing or not - I originally disliked them, believing that they marred the natural aesthetic of the rammed earth, but I have come to see them as part of the story of the wall so part of me is sorry to see them fade.


Besides that, the walls haven’t changed very much at all. The bases of a couple of the panels have been almost continuously submerged in a centimetre of water through the winter as there’s a slight low spot in the slab, but they appear to be totally unaffected by this. There’s no staining nor change in their structure, so I guess the Plasticure additive really does work as well as they suggest.


Now that the weather is starting to warm up a little and the atmosphere is drying out though, I’ve noticed that the panels are starting to shrink ever-so-slightly. Each of the control joints is opening up just a fraction:


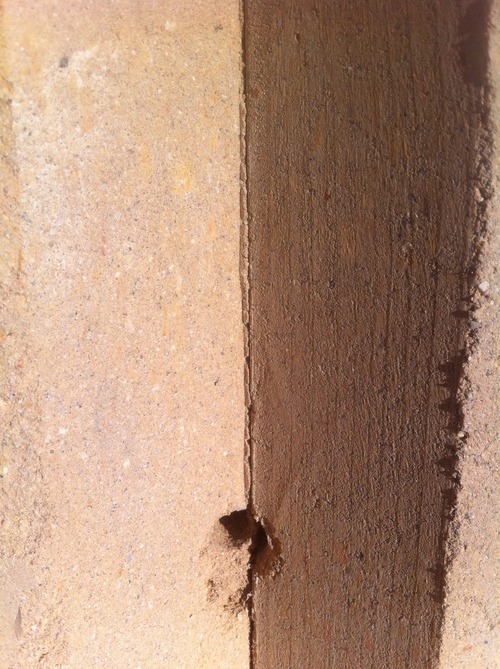
This is a very good thing, as it means they’re doing the job they were designed to do and the panels themselves are not at risk of cracking in more unsightly (and structurally hazardous) ways.


With that said however, I have noticed one or two very fine hairline cracks appearing horizontally in the walls, along layer boundaries.


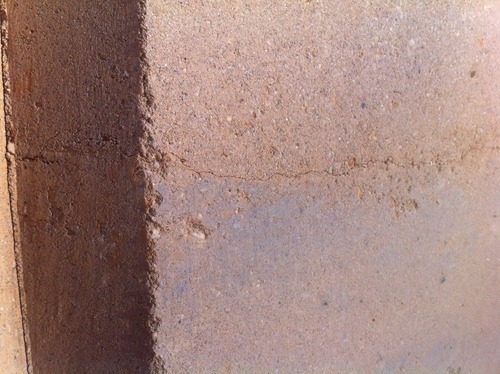
I’m not at all concerned about these - I would have been astounded if there were none as the walls shrunk, and even without the internal reinforcement I doubt they’d cause any structural worries at all.


It won’t be long now before the wall starts taking its load - the suspended concrete slab will be poured in the next month or two. It’s going to be great seeing these little parts of the project all coming together :)

Saturday, September 22, 2012


As promised!


The trenches are all done, and the area below the slab-on-ground has been filled and compacted using the spoil, creating a (mostly) level basis upon which to lay the sandwich panel forms. I wasn’t going to fill this area in, but there was so much soil to deal with from the excavations that I just pushed it down the hill, leveled it off and compacted it.


I’ve booked the trench inspection for Friday arvo, which should give me plenty of time during the day to clean them out and also put in the mini-trench needed for the kitchen drain. Concrete footings are being poured on Saturday at sparrows! :)


(Weather permitting, of course.. The forecast is looking rather ordinary for Friday…)


Beautiful digging weather!


Spring is here with a vengeance - the sun is out, the ground is dry and the bobcat is digging like a champ!


Barring any more unforeseen rock, I should have the trenches all done today.

Friday, September 21, 2012


Holy hell!


I don’t know what brand of rock this is, but I’m pretty certain it isn’t siltstone any more.


It. Is. HARD!!


The rock breaker on the bobcat isn’t touching it, all I’m doing is creating dust. Strangely enough the most effective way to break it up is to hit it in odd directions with a lump hammer with my eyes closed…

Thursday, September 20, 2012

Back in the rock breaking business

I was at the swimming centre with the boys earlier in the week, and was asking around if anyone knew a good welder.


Turns out the father of one of the employees (Hi Sam!) has an engineering workshop locally, hidden away in a back street. So I paid them a visit and a couple of days later the rock breaker attachment plate is all welded up nice and strong, plated over where it’s broken. It’s unlikely to break again :)


So I’m meeting the plumber on site tomorrow to plan out the drains in the slab, then I’ll dig the rest of the foundation trenches. I’m planning to have the earthworks finished this weekend, wish me luck!


I’ve also been beavering away feverishly in SketchUp, putting the finishing touches on my truss detail so I can place the order for them. I’ve pretty much got the spec drawn up, so with any luck I can place the order in the next week or two.


The other imperative is to buy the polystyrene sandwich panels I’m planning to use as formwork for the suspended slab, and the associated form ply and timber I’ll need in order to prop them for the pour. As with everything else, I’ll draw up the formwork and props in SketchUp first. Stay tuned! :)

Sunday, September 16, 2012

Bugger!

Told you that rock was tuff stuff - I gave it another hit with the rock breaker, and broke it instead.


Actually, I broke the attachment plate last year when digging the trenches for the garage slab, and had a go at welding it back together again myself. Trouble is, my welding gear is too small and not up to the task of welding this, so while I managed to tack it back together again it’s not strong enough to withstand the strongest rock. Hence it gave out again this afternoon. I’ll have to find a steel fabricator during the week and get them to fix it properly.


So once I gave up breaking bits of the bobcat, I got the rest of the first trench dug in less than an hour.


The rotary laser makes digging to depth a snap, so this trench is nice and consistent in depth, even if it’s not as straight as it could be. With so much rock in the ground it’s near impossible to cut a straight line, and besides that there’s so much slop in the backhoe arm and bucket that it’s a miracle I can dig within 10cm of my intended line :)


With this long trench done I turned my attention to the first short one in the same corner as the troublesome rock, but the seam runs straight across that corner of the slab so I hit it again in no time flat. I managed to break it up a little with the backhoe, but I really need the rock hammer to get to my depth so it will have to wait until next week.


At least I’m producing plenty of building materials here - the main spine of the dwelling which will be built on this slab is to be a slip-formed rock wall, so all this siltstone will be put to good use!


Saturday, September 15, 2012


Hard rock!!


This is in the way, and doesn’t want to move. It’s seriously tough stuff - the hammer on the bobcat is barely touching it, if that is I’m able to get a square hit at it without sliding off.


I love the siltstone we have in the ground here - it makes a gorgeous building material.


Where I don’t like it however is when there’s a seam of the stuff running right through my line of trench - it fractures and splinters really well, but it’s a sod to get out of the ground! Rock breaker to the rescue :)

Friday, September 14, 2012

Not bad

Set up the rotary laser this afternoon to check the level of my excavation, and whaddya know, it’s not bad at all. I have one very slight high spot, and an area which I knew was too low, but now I know by how much! :)


Most of the day today was spent stuffing around floating our horse, so I think I’ll wait until the morning to get started on the trenches.


Mental note: must get in touch with the plumber to plan the layout of the pipes which need to go in before the slab…

Wednesday, September 12, 2012

Planning

As the winter has finally begun giving way to spring, the weather is starting to improve and I’ll be able to get more real progress made on site. Since it’s nearly the middle of September (where does the time go!?) I’m going to need to get organised before the Christmas rush.


Here’s what I’m planning to get done between now and then:


  1. Dig the trenches for the upper slab-on-ground. Now that I have the site excavated, I should be able to make a start on these this coming weekend all going well. I picked up a rotating level during the week too, so I’ll also be able to see how bad a job I did of the levelling :)

  2. Form up the slab-on-ground, and place and wire the steel reo mesh.

  3. Acquire, place and prop the insulated sandwich panels which I’ll be using as base formwork for the suspended slab, between the slab-on-ground and rammed-earth wall.

  4. Build forms around the base suspended formwork and retaining wall to contain the concrete, and place and wire the steel for this slab.

  5. Pour the concrete for the slab-on-ground and suspended slab, in one go.

In amongst that lot I also need to calculate how much framing timber I’m going to need to erect the frames and then order it, as I’m planning to get this done over the Christmas break. Rather than make our usual annual pilgrimage to Brisbane to see family, I’m going to spend this year framing. Can’t wait! :)


In addition to that, I need to order the roof trusses too - if I wait until after Christmas to order them, I’ll be waiting until March before I can get them up. I’m planning (hoping) to get close to lock-up by then, so I’ll also need the roofing materials, doors and windows done as well. Not to mention erecting the Hebel panels which we already have on site (an eBay bargain earlier in the year)…


So it’s going to be a busy few months, if not the actual work of building then planning, calculating, and ordering!

Saturday, September 8, 2012

Digdug

First thing on the agenda this morning was to address the exhaust leak before climbing back into the machine. The exhaust system currently on the engine is modified from the original design, and whoever did it made the mistake of hard-mounting the muffler and exhaust pipe to the frame of the machine. Although they fitted a “flexible” joint (i.e. not very) between it and the manifold, the constant movement of the engine has fractured that and hence the leak.


I managed to shorten the joint and stretch it out a little to remove the fracture, but it’s still an imperfect seal on both ends as I don’t have any exhaust sealant paste on hand, so it’s still puffing a little. Much, much better than it was though so I’m happy enough to get stuck back into it.


There’s some biiiig rock in the ground in these parts. Much of the Tallarook Ranges is Big Granite country with boulders bigger than cars, but the granite only comes so far up the hill and stops just below our property. Instead we’ve got bulk quantities of siltstone and hornfels (ironstone), which are themselves pretty useful building materials. We’ll be using stone in a few places both internally and externally; we’d be mad not to! :)


This is a sample of what came out of the ground yesterday…


These might make good foundation stones for a wall.. that’s about the only place we could use them since they’re too heavy to lift by hand :)


So with a few more hours on the machine, I’ve pretty much completed the levelling of the site ready for trenches. I had planned to not fill the ground area below the excavation towards the retaining wall, instead intending to keep the area clear as a space under the suspended slab for storage, but there was just waaay too much soil to put somewhere, so in the end I just pushed it down the hill and levelled it off and compressed it with the bucket and smudge bar.


After picking my line of level with a spirit level and string line, I managed to keep the excavation pretty level just by eye, but I think I’ll pick up a rotating laser level during the week so I can fine-tune the level and get it just right. Then I’ll be in a position to start on the trenches! :)

Friday, September 7, 2012

A-digging we shall go

It’s really, really good having the bobcat back up and running again - I can finally get some productive work done on the build :)


I spent most of the day today with the backhoe attached, excavating out the hillside in preparation for digging the trenches for the slab. The machine is working really well, and it now appears that the failure was a blessing in disguise - while up to my elbows in bobcat guts I adjusted the brakes on the side I was fixing, and they’ve been an absolute necessity while digging on the hill. I could have operated safely (carefully) without them, but having confidence that the thing won’t move unless I tell it to makes the job much easier.


After the best part of a day, I’ve pretty much completed the bulk of the excavation:


There’s still a little earth to move from the cutting which I’ve just loosened and piled up given my limited reach with the backhoe, but I’m calling it a day a little early - there’s a minor exhaust leak in the engine bay which really needs to be fixed, and prolonged exposure to the (admittedly dilute, given the wind) fumes is giving me signs of nausea, which is warning enough that it’s time to stop.

Monday, September 3, 2012

Trials and Tribulations, part 3

Two days, give or take. That’s how long it took to fit the new idler sprocket and get the bobcat put back together again. It’s never as simple as it seems…


First. This new assembly is significantly larger than the (bits of the) one which came out. This is a good thing, as it’s infinitely stronger, but the space in which I have to work is not infinitely large, so manoeuvring it into place is .. challenging, to say the least.


In the end, I found it necessary to almost completely disassemble the chain case - the brake disc had to come out, which meant removing the primary drive chain. In a stroke on incredible luck, both chains’ removable links were smack bang at the top, right in front of me so splitting the chains was fairly straightforward. With the brake disc out of the way,  I could at least get the idler close to it’s position, but being much wider it fouled on the reduction sprocket by a couple of millimetres - just enough to prevent getting it into place, but also enough that I couldn’t wiggle it in. So, the reduction sprocket had to come out as well.


In the end, it all went together:


Twenty litres of oil (not mayonnaise) and another half a day of assembly, and it’s all back together and - wait for it - IT MOVES! :D


Bonus points too - while I was in there I adjusted the brake caliper, so now I have working brakes as well! Just like a new bobcat again :)


So, in celebration I tried to break it again:


Thankfully I failed, and in the process of failing at that I managed to dig out half the hillside. There’s still plenty of digging to go, but I had two or three hours of good progress and I’ve at least made the first cut and so the rest should come together reasonably easily.


Now, if only the weather will cooperate…